The Process of Wood Engraving
Wood engraving is a relief printmaking process that for me begins with the development of a design. My initial drawing is taken through a number of progressively more developed stages until I have a quite simple but very clearly defined pure line drawing. This is my finished drawing and is now ready to be transferred to the block.Box wood (Buxus sempervirens) is the material best suited for making a wood engraving, and for my smaller engravings this is what I try to use. However, most of my engravings are quite large, as wood engravings go, and this generally means choosing a timber that will provide larger sections on which to work. The blockmaker can help by joining a number of pieces of wood together to form a single block, but in choosing Box to make a block 8 x 10", it might mean joining sixteen or twenty separate pieces which can result in the block being unstable and perhaps eventually splitting. So, almost all of my larger blocks are made of Lemon wood (Gossypiospermum praecox) which, though not as close-grained as Box, does provide larger sections of end grain wood thus reducing the number of joints necessary.
When wood engraving I always rest the block on a leather sandbag. For the largest blocks, a sandbag of 18" diameter is needed to give sufficient support whilst at the same time allowing the block to be freely manipulated in conjunction with the engraving tool. I have acquired more than 30 tools over the years and I do use most of them, though only about five or six are in constant use. These would be my favourite spitsticker, a graver, two or three tint tools and a modified scorper. Cuts need to be clean and crisp in order that they print well and so tools need to be continually sharpened during the engraving process. I am in effect drawing with light, for it is the engraved or lower areas that show as white and tonal variations can be suggested by fine stippling or hatching.
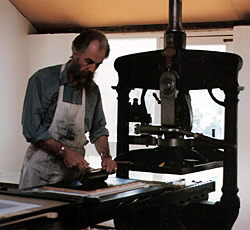
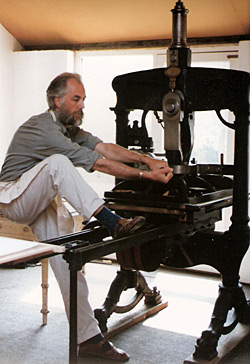
A wood engraving can take anything from a week to three or four months to complete depending upon the size and intricacy of the image. Once the engraving is complete, I apply ink by hand with a roller to the newly created "relief" surface. My press is an Albion dated 1869. It is made of cast iron and is complete with a tympan and frisket. I generally use a Zerkall paper but unquestionably, the paper I have found to be best for printing wood engravings is Gampii Vellum, a handmade Japanese paper. It takes two or three days to print an edition of 75 prints from a large block and I normally limit my editions to between 50 and 100. Paper and ink will usually dry within forty-eight hours. I can now give each print a final check and assemble enough good proofs to complete the edition. The selected prints are then signed and numbered showing the size of the edition.
All the prints are originals taken directly from the block. This differs radically from a reproduction print where an original painting is photographed and mechanically printed. Each print is signed and numbered and editions are strictly limited as shown.
Colin See-Paynton.